I was inspired to create this post when I found that there are some pretty weak top 10 lists about WordPress on the web. I spent so much time searching for the ideal list that I felt a strong desire to compile one myself.
1. How To Mobilize Your WordPress Site
You’re probably missing out on quite a few readers, and you’ll miss out on more if you don’t go mobile with your blog. In January 2012, nearly 9% of all global pageviews were from a mobile device. This number is expected to keep growing, to the point where in 2015 the pageviews from mobile devices will outgrow the pageviews from laptops and personal computers. Upgrade your site to have a mobile version!
The easiest way to do this is through the free plugin WP Touch. Once installed, you edit some settings, create a few icons or use stock icons, reformat some pages if necessary, and you have a beautiful mobile site that looks and functions like an app! Now if someone opens your blog (let’s say from an email, or from a Facebook link) on their phone, they’ll actually be able to consume your content easily, as well as comment on it and share it, rather than zooming in and out in frustration trying to navigate your site.
If you want to take things to the next level, upgrade to the premium version WP Touch Pro, which has some additional options to customize even further.
A lot of newer themes are also mobile friendly (responsive), meaning they already have a mobile version built in, so you don’t have to worry about it. So if you’re thinking about changing themes, keep this in mind while doing your research.
Here is how a post on my personal site looks in mobile when the mobile version is active:


Here is how it looks when the mobile version is not active:

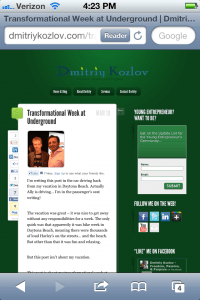
Which is easier for someone to read? Which will they stay on longer and engage with longer?
Upgrade your site to mobile and be better prepared for the future.
2. Speed up! Some Plugins to make editing your posts more efficient
Viper Video QuickTags
If you have ever embedded a video, you know that you need to use HTML code to make it happen. Make your life easier and save time by utilizing the Viper’s Video Quicktags plugin.
After installing the plugin and adjusting a few settings, you will have the ability to copy and paste the video link and embed videos with the click of a button. The plugin is super simple to use and gives you the option to embed more than one video at once!
Check out the activation details below:
1. Viper’s Video Quicktags will show up on your Dashboard Menu under “settings”
2. Uncheck everything under “Show Editor Button” except for YouTube
4. This will create a button when you add a page/post
5. Click on the new button above the WYSIWG visual page editor
6. Paste the direct URL to your video and edit the size by opening the accordion below
7. Click okay and this will populate a shortcode into the post box
8. Click on update and check out your super slick videos once you refresh the page!
Mission accomplished in a quarter of the time and you didn’t even have time to think about it before the video was embedded and sized.
Faster Image Insert
Embedding images into a page requires a couple of steps. You need to click on the media button and this opens a light box. Once you upload the image, you can edit the size and insert into the page or post.
The process is slow because a lightbox has to load in between every image that is added. It’s easy to imagine why waiting for a lightbox to open in between inserting each image can get pretty annoying, and not to mention time-consuming. This is where Faster Image Insert comes in.
Faster Image Insert allows you to upload images much faster because it adds a meta box (no more lightbox) right below the WYSIWYG visual editor. You can insert multiple galleries or images at once, including NextGen Galleries, which is pretty awesome. You can also change title/captions on a mass scale with a single click.
It appears right below your post, whether in visual or HTML:

3. Plugins to boost your SEO
All In One SEO Pack
This plugin is a must have for anyone interested in getting search engine traffic. It is great for both the beginner and the advanced user. The plugin is intuitive and includes features like automatic optimization of your titles for search engines and meta tags. This is a plug and play plugin, which means that it is effective as soon as it is activated.
Advanced users are able to fine tune just about any setting, such as the ability to override any title and set any meta description and meta keywords you want. This is going to increase your SEO presence drastically, which will definitely help you increase your sites traffic.
Google XML Sitemaps
In order for your site’s pages and posts to be found in Google’s search engines, they need to be indexed/stored in Google’s massive database of websites and other web content.
There are many ways to get indexed faster by Google such as Tweeting your new page or post but using this plugin makes the process simpler.
Each time you create a new post or page, the plugin will update your site’s XML sitemap (which the search engines use to index your site) and automatically let the search engines know about the update. The benefit here is obvious. Get the plugin asap and start sending your message to a larger audience.
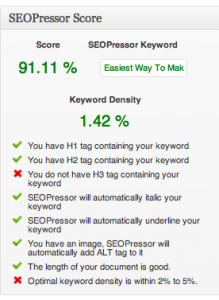
SEO Pressor
SEO Pressor takes the SEO within your blog posts to a new level. It allows you to write for a specific keyword, and measures your post white you write for how effectively you are writing for that keyword. It even gives you an overall score along the way. Here’s a screenshot of what it does:
4. How To Uncrash Your Site! (for plugin issues)
Steps to Uncrashing Your Site
This is one of the easiest problems to fix, yet I still notice a ton of forums being bombarded with questions like “I Installed a plugin and my site crashed!! I need a developer ASAP!”
Take a deep breath, regain your composure and listen to me. Even though the issue may appear to be fatal, it is actually one of the simplest issues to fix.
Here are the 5 easy steps to uncrash your site:
1. Login to your FTP Client
2. Find the Plugin Folder in your Directory
3. Sort Plugins by “Last Modified”
4. Select the Plugin in Question
5. Delete the Plugin
Once Plugin is deleted, it will no longer show up or crash your site. You can thank me after you calm down!
5. Plugins to Make Affiliate Marketing Easier
Pretty Link
Say you have an affiliate link: www.domain.com/longconfusingmess
Let’s also say you have a domain called: www.incomediary.com
Wouldn’t it be awesome if you could customize the link and still get credit for the referral? Wouldn’t it also be valuable if you could track both the total number of clicks as well as the total number of unique clicks to monitor performance – regardless of if the link is in your email, WordPress site, or anywhere else?
Pretty Link allows you to do both. The process is super simple and it creates a ton of value. Here is an example:
Before Pretty Link: www.hostgator.com/longconfusinglink
After Pretty Link: IncomeDiary.com/hostgator
In addition, it tracks both total and unique clicks and displays the respective numbers in the plugins options. Pretty damn awesome.
It also makes it easy for you to remember all your affiliate links in case you ever need them on the fly while chatting with someone. This alone has easily hundreds of extra dollars in my pocket .
Amazon Associate Filter Plugin
Amazon is one of the largest and most well known internet companies in the world. It would only make sense that the Amazon Associate Program is one of the best affiliate programs, aS they offer a massive number of product categories, which is great for Niche sites that are unable to find relatable affiliate programs.
Amazon makes it very simple to integrate the program with your current site. If you don’t have an account, I highly suggest that you head over to the site and sign up.
The Amazon Associate Filter is a great time saving plugin for Amazon affiliates. It automatically will change any links to the amazon website to your affiliate link without revealing it to the reader. Say goodbye to being slowed down by finding and pasting your affiliate link into your page or post. Amazon Associate Filter is a must have plugin for any Amazon Affiliates!
6. Contact Forms – you have options!
When you first logged into WordPress you may or may not have notice that there is no page or theme option to add a contact form to your site. Contact forms allow visitors to contact you with questions, complaints, suggestions, etc.
Here’s some good news: You have options! I introduce you to three here, but use Google to find more information. You may even discover a brand new plugin that makes Gravity Forms look like childs play. Don’t spend too much time, but definitely check out a link or two.
Contact Form 7 (Flexible)
If you value simplicity and flexibility, Contact Form 7 is a great option. It allows you to design the form, email, and even lets you manage multiple contact forms. In addition, it supports many features including AJAX submitting, CAPTCHA, Akismet spam filtering, file uploading, and more.
Contact Me
In addition to providing you with a neat and flexible contact form, this plugin allows you to have a floating contact me/us floating button on the side of your site on every page, like this:
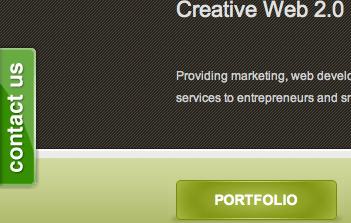
It’s a nice call to action, especially if you provide any services or are looking for leads to get in touch with you. While the plugin itself is free, to remove the Contact Me branding and get more options, you do have to upgrade to the premium version.
Gravity Forms (Premium)
If you prefer a premium contact form that includes an intuitive user interface and the works in terms of options, then Gravity Forms is the best option for you. While the plugin costs a little bit of money, the time it saves you and the improvement in quality is well worth it, especially if you are building multiple forms.
7. Make Your Site Neater and brand more visible!
Favicon! – plugin and creation tool
A Favicon is the little image that shows up on your browser’s tabs when browsing your site and can really help brand your site. It may be a small image, but has potential to be a significant part of your branding effectiveness.
An awesome site for Favicons is: www.favicon.cc. You can even draw a custom Favicon but I don’t recommend this because it has proven to be less effective – unless you’re great with design. You can also upload an image and turn it into a Favicon, or find tons of free favicons that might match your brand.
Plugin: All in One Favicon
All in One Favicon uses the favicon you created and displays it on the browser tab for the public. You can create both front end (what the viewer see’s) and back end (what you see in your dashboard). If you don’t have a favicon, you are missing out on an opportunity to brand your site.
Logo – cooltext.com
While creating a custom logo in Photoshop or Illustrator is great – a lot of new bloggers don’t have the skills, time, or money to do so. You can actually create a unique text based logo in minute using this cool tool. It’s a lot better than having a plain text header on the top of your site!
Enter: CoolText.com to save the day (or at least a few minutes). They offer a ton of customization options which makes the experience much more personal.
You can choose from a boatload of fonts, effects, colors, sizes and file types. I promise that you can create very professional logos as long as you make sure to explore ALL of the options first. The best part is – it’s all free!
8. Speed up your Site!
Get A Caching plugin
I’m sure you have been on a blog or even corporate site that feels as if it is taking forever to load. Why would you want someone to have the same, annoying experience? A slow site can have devastating effects on site traffic, but thankfully there is a plugin to make it easy to speed your site up.
There is a solid selection of Caching Plugins on the web. The most popular ones are W3 TOTAL CACHE and WP SUPER CACHE, but don’t let this stop you from researching and trying out other programs.
A caching plugin is valuable because it saves your page the first time that a visitor visits it.It then will used this saved information to automatically load the page based on the information. It will also automatically re-cache your site if any content changes!
One less thing to worry about.
Some tips: One of the simplest ways to speed up a slow site is to be sure to deactivate all of the plugins that you are not currently using on your site. We recommend a lot of plugins here and I know this may appear to contradictory, but it’s important not to go overboard! Deactivate unimportant plugins, especially those that work on the outside of your site vs. the admin panel, and you will see the difference in speed.
Decrease Image Sizes before Uploading – Some people just upload images and then resize them using the WordPress (HTML) image editor. Try to avoid this when you can. Go into Photoshop, Save For Web and Devices, and resize the images to your desired dimensions. That way you get smaller file sizes, which load faster, and speed up your site, sometimes very significantly.
9. Get Social!
You work hard putting great content on your blog. Make sure it’s easy for people to share and discuss so you get more traffic, credibility, and user engagement.
Sharing
I recommend using the Digg Digg plugin. It’s the quickest, simplest, and neatest way to get all your social media sharing buttons on your posts.
If you want to look cool, use the floating option (like you see to your left). There are a ton of sharing options, and which ones you use depends on the nature of your content.
I recommend including at least: Facebook Like, Facebook Share, Twitter, Google+, Pinterest, and LinkedIn. The rest is up to you.
Comments
I STRONGLY recommend Facebook comments. They will get you more comments (people are so familiar with Facebook comments already, it’s more natural for them to Like and
Comment via Facebook than through the WordPress commenting system), they will reduce your spam comments, and they will ultimately get you a lot more social links back to your site, so more traffic! Make sure you make the settings such that it automatically posts the comment on Facebook unless the commenter disables it.
The other social commenting option is Disqus. It’s also a free plugin which allows people to comment through social profiles, but since people are usually logged into Facebook when surfing the web,
Facebook comments will likely get you more traction than Disqus.
10. Get Personal!
Make sure you brand yourself in your posts and your comments on others blogs!
Start by completing the profile in Users > My Profile with your complete bio, and include this bio on the bottom of your posts (this is usually just a theme option). Your bio helps people connect with you and makes them want to learn more about you. They’re not just reading your content – they’re reading you!
Next – and this is very important – head over to Gravatar.com and create your Gravatar. This is like your profile image on the Internet. You should add all the email addresses you use in WordPress sites, whether on your own site or any you might guest blog on. Add a cool image of you that people will remember (for example, see my Parrot picture in Aruba below!).
If you made a WordPress.com account at some point, you might already have a Gravatar and not know it. Try logging into Gravatar.com with your WordPress.com details before making yourself a new account, to make sure you can get the username you want and your primary email address.
Save Your Save Some Time, Energy, and Money
Do you think some of the tools and tricks in this post will save you some time and create more money for you with your blog? When applied, of course they will.
This is just a small list. You can literally become a total WordPress master – and save yourself a LOT of time, energy, and money by taking this course: Make WordPress Easy. It’s not only the best course on WordPress – it’s also extremely entertaining to watch. Enjoy it!
I hope this list helped you out a lot. If you have any questions about any of these, or have any additional tips, please comment below!


0 comments:
Post a Comment